

Preface
For anyone reading this, first off please note that none of this would be possible without the work that Dennis Giese, braelynn, and many other people did before me. I am mostly just building off of the stuff they have already figured out (the actual hard stuff).
The robot I have is a Ecovacs Deebot T8 AIVI. I've had it for about 4 years at this point and has recently been replaced by a Dreame X40 (which I have been very happy with). So now instead of sending this thing to the robot trash heap, I will attempt to turn it into a robotics learning platform. It should be a pretty good candidate hardware-wise since it has lidar, a camera up front and a speaker.
I have recently been experimenting with agentic autonomous AI in some other projects so perhaps I will try to implement that here. Obviously the onboard hardware won't be able to run the model locally but perhaps I can run it to an external server running a model to make high level decisions. But I am getting ahead of myself here, lets see what we can find on here first.
Links
- My repo with notes, scripts, and stuff: https://github.com/samr28/ecovacs-t8-aivi-hacking
- Ecovacs root password calculator
- https://robotinfo.dev/
- Talks
- Ecovacs hacking notes from itsjfs: https://github.com/itsjfx/ecovacs-hacking/blob/master/x1_omni.md
- https://www.reddit.com/r/robotics/comments/1hknivp/following_up_on_my_ecovacs_deebot_n8_hacking/
Serial TTY
There is a debug port at the top of the unit after you open the top cover. I did some continuity testing with a multimeter (I don't have a logic analyzer lol) and found a GND pin. Then I did some trial-and-error testing, hooking the RX pin from my UART adapter to all of the other pins and was able to get some output on one of the pins! I then proceeded to struggle for a while trying to figure out which pin was the robot RX pin. I was close to giving up when I stumbled across this reddit post which already had the answer.
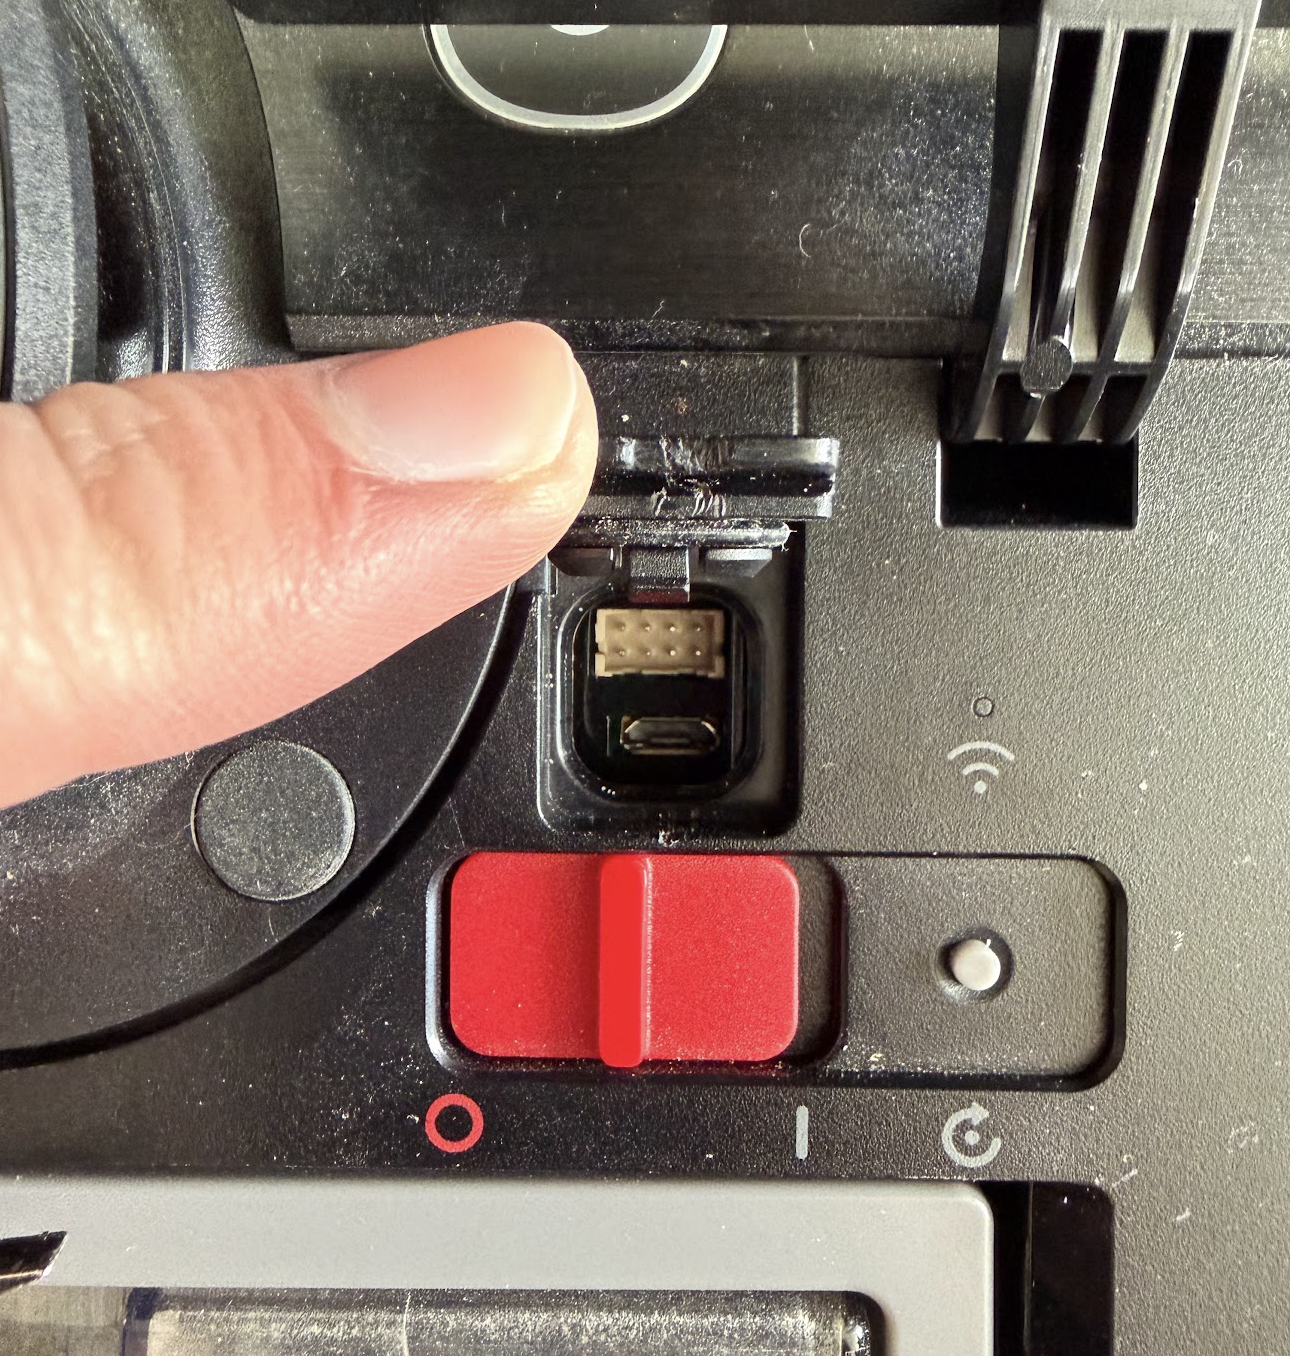

Here is the pinout for the Serial UART. Just connect the RX from your adapter to the TX on the robot and the TX from your adapter to the robot RX. Then you should see this!
U-Boot 2017.09-g544e48e (Dec 02 2019 - 16:40:24 +0800)

Model: Rockchip PX30 Ecovacs
PreSerial: 2
DRAM:  510 MiB
Sysmem: init
Relocation Offset is: 1dbff000
Using default environment
...
deboot login:
Root Password
From Dennis Giese:
Password algo:

Just for reference, this is what the ecopasswd php does

$mach = "mr2201"; //goat
$sn= substr(strtoupper($string),-8);
$md5 = hash('sha256', $mach."d4:3d:7e:fa:12:5d:C8:02:8F:0A:E2:F5".$sn."\n");
$rootpw = base64_encode($md5."  -\n");

For deebot T8, match is:
px30-sl

For deebot T8 AIVI, match is:
AI_px30
I translated this from php to a simple python script which you may be able to use to crack your root password:
#!/usr/bin/env python3
"""
Ecovacs root password calculator.
Algorithm from Dennis Giese (dontvacuum.me).

Usage: python3 ecopassword.py <serial_number>
"""

import hashlib
import base64
import sys

MACHINES = {
    "goat": "mr2201",
    "x1": "x1",
    "x2": "x2",
    "t20": "t20",
    "t30": "t30",
    "airbot_z1": "airbot_z1",
    "9x0": "9x0",
    "t8": "px30-sl",
    "t8 AIVI": "AI_px30",
}

MAC = "d4:3d:7e:fa:12:5d:C8:02:8F:0A:E2:F5"


def calc_password(serial: str, machine: str) -> str:
    sn = serial.strip().upper()[-8:]
    raw = f"{machine}{MAC}{sn}\n"
    sha = hashlib.sha256(raw.encode()).hexdigest()
    pw = base64.b64encode(f"{sha}  -\n".encode()).decode()
    return pw


def main():
    if len(sys.argv) < 2:
        print(f"Usage: {sys.argv[0]} <serial_number> [machine_key]")
        print(f"       machine_key defaults to 't8' (px30-sl)")
        print(f"       available keys: {', '.join(MACHINES.keys())}")
        sys.exit(1)

    serial = sys.argv[1]
    key = sys.argv[2] if len(sys.argv) > 2 else "t8"

    if key not in MACHINES:
        print(f"Unknown machine key '{key}'. Choose from: {', '.join(MACHINES.keys())}")
        sys.exit(1)

    machine = MACHINES[key]
    password = calc_password(serial, machine)

    print(f"Serial (last 8): {serial.strip().upper()[-8:]}")
    print(f"Machine string:  {machine}")
    print(f"Root password:   {password}")


if __name__ == "__main__":
    main()
I just ran this script with my serial number and machine = t8 AIVI and bam I was in!
Backup
Save existing partitions before we start mucking around in here. I will be backing up the following:
- rkflash0p7 → rootfs1.img
- rkflash0p9 → rootfs2.img
- rkflash0p6 → boot1.img
- rkflash0p8 → boot2.img
- rkflash0p5 → sys.img
- rkflash0p3 → mx.img
- rkflash0p4 → my.img
- rkflash0p10 → data.img
- rkflash0p1 → uboot.img
- rkflash0p2 → trust.img
# On the robot
nc -l -p 9999 < /dev/rkflash0p7

# On host machine
nc 192.168.0.17 9999 > rootfs1.img

# (repeat for all partitions)
Setting up remote SSH access
Build dropbear
Next order of business is being able to SSH into the robot without using the debug port. This was actually a bit more difficult than I was expecting.
I had to patch two dropbear security checks that are incompatible with the read-only squashfs rootfs: the authorized_keys path ownership check (which fails because / is owned by uid 121 instead of root) and the /etc/shells validation (which rejects /bin/sh since only /bin/bash is listed).
# Build dropbear with patch on local machine using docker
docker run --rm --platform linux/arm64 -v "$PWD:/out" debian:bookworm bash -c "
  apt-get update -qq &&
  apt-get install -y -qq build-essential wget zlib1g-dev &&
  wget -q https://matt.ucc.asn.au/dropbear/releases/dropbear-2025.89.tar.bz2 &&
  tar -xf dropbear-2025.89.tar.bz2 &&
  cd dropbear-2025.89 &&
  sed -i 's/return DROPBEAR_FAILURE;/return DROPBEAR_SUCCESS;/' src/svr-authpubkey.c &&
  grep -n 'DROPBEAR_FAILURE\|DROPBEAR_SUCCESS' src/svr-authpubkey.c &&
  ./configure --enable-static LDFLAGS=-static &&
  make PROGRAMS='dropbear dropbearkey' -j\$(nproc) &&
  cp dropbear /out/dropbear

# Copy the binaries over to the robot
# On the robot
nc -l -p 9999 > /data/dropbear

# On the host
nc 192.168.0.17 9999 < dropbear

# On the robot
nc -l -p 9999 > /data/dropbearkey

# On the host
nc 192.168.0.17 9999 < dropbearkey
Setup autostart script
Through investigation, I have found that the robot uses busybox init, which on boot runs /etc/rc.sysinit. That script iterates over a list of daemons defined in /etc/rc.conf and runs each one from /etc/rc.d/. One of those daemons is autostart.sh, whose source at /etc/rc.d/autostart.sh explicitly loops over every .sh file in /data/autostart/ and executes it with start as the argument.
So tldr, the robot will run any sh scripts in /data/autostart so we can use this to add a script which connects to wifi and then starts dropbear. Then we will always be able to ssh into it remotely!
Create /data/autostart folder if it doesn't already exist. Then create /data/autostart/sshd_start.sh with following contents. Don't forget to chmod +x /data/autostart/sshd_start.sh. Finally hit it with a reboot and cross your fingers.
#!/bin/sh

# Configure wifi
wpa_cli -i wlan0 add_network
wpa_cli -i wlan0 set_network 0 ssid '"your_ssid"'
wpa_cli -i wlan0 set_network 0 psk '"your_pass"'
wpa_cli -i wlan0 set_network 0 key_mgmt WPA-PSK
wpa_cli -i wlan0 enable_network 0
wpa_cli -i wlan0 select_network 0

# Wait for association
sleep 8

# Get DHCP lease
dhcpcd wlan0

# Fix /etc/shells so dropbear accepts /bin/sh
echo -e "/bin/sh\n/bin/bash\n/bin/busybox" > /tmp/shells
mount --bind /tmp/shells /etc/shells

# Start dropbear
/data/dropbear -E -p 22 \
  -r /data/dropbear_keys/rsa_host_key \
  -r /data/dropbear_keys/ecdsa_host_key \
  -r /data/dropbear_keys/ed25519_host_key \
  -D /data/ssh_auth &
After this, I had ssh access remotely and I closed up the debug port :D
Thus concludes part 1. Next will be investigating whats running on this thing and trying to get it to move around.